Growing healthy, productive tomato plants requires consistent and efficient watering, and drip irrigation emerges as the most effective solution for home gardeners.
This water-saving method delivers precise amounts of moisture directly to plant roots, maximizing growth while minimizing waste and disease risk.
To manage water well, growers should avoid common mistakes. One mistake is overwatering in containers. This can cause root rot and poor growth. (See: Tomato Container Watering: Avoid Overwatering).
Why Drip Irrigation is Perfect for Tomatoes
Tomato plants are particularly well-suited for drip irrigation systems due to their specific water requirements and vulnerability to foliage-related diseases.
Drip irrigation can boost tomato yields by up to 48% while reducing water consumption by 90-95% compared to traditional watering methods. This efficiency stems from delivering water directly to the root zone, where plants need it most.
The benefits extend beyond water savings. By keeping foliage dry, drip irrigation significantly reduces the risk of fungal and bacterial diseases that commonly affect tomatoes, including downy mildew, alternaria, and grey mould.
This targeted watering approach also prevents soil erosion and nutrient leaching while ensuring consistent moisture levels that prevent common problems like blossom end rot and fruit cracking.
Diagram of a DIY drip irrigation system for 100 tomato plants with labeled components and layout of watering lines for effective garden irrigation
Understanding Tomato Water Requirements
Tomato plants require substantial amounts of water, especially during fruit development. A mature tomato plant needs at least one gallon of water daily during peak growing conditions.
More specifically, tomatoes require approximately 1-1.5 inches of water per week, with requirements varying based on growth stage, weather conditions, and planting method.
For container-grown tomatoes, daily watering may be necessary, particularly during hot weather when plants can consume up to a gallon per day.
In raised beds, deep watering 3-4 times per week typically suffices, while garden-planted tomatoes generally need watering every 2-3 days.
The water needs change throughout the growing season:
- Seedlings: Require consistent moisture with light daily watering
- Established plants: Need deeper, less frequent watering to encourage strong root development
- Fruiting stage: Demand the most water to support fruit development and prevent cracking
Tomato plants growing in rows with drip irrigation and black plastic mulch for efficient watering and healthy growth
Essential Components For DIY Drip Irrigation
Building an effective drip irrigation system requires several key components, each serving a specific function in water delivery and system control.
Water Source and Pressure Control
Start with a pressure regulator to maintain consistent 25-30 PSI throughout the system. Most home water supplies operate at 40-60 PSI, which can damage drip components without proper regulation. A backflow preventer is essential to protect your home’s water supply from contamination.
Filtration System
Install a water filter to prevent debris from clogging emitters. Screen filters work well for most applications, while disc filters provide superior filtration for water with high sediment content. Regular filter maintenance is crucial for system longevity.
Distribution Network
The system’s backbone consists of:
- Main line tubing (½-inch polyethylene) carries water from the source to growing areas
- Lateral lines (¼-inch tubing) distribute water to individual plants or areas
- Connectors and fittings (tees, elbows, couplers) direct water flow where needed
Water Delivery Components
Drip emitters are the heart of the system, controlling water flow to plants. For tomatoes, 1-4 GPH (gallons per hour) emitters work well, with spacing determined by soil type: 12-18 inches for loamy soil, 10-12 inches for sandy soil. Pressure-compensating emitters ensure uniform water delivery regardless of elevation changes or line pressure variations.
Young tomato plant receiving targeted watering through a drip irrigation system directly at the roots
Step-by-Step DIY Installation Guide
Planning Your System Layout
Begin by mapping your tomato planting area and grouping plants with similar water needs. Measure the distance from your water source to the furthest plant to determine tubing requirements. For a typical home garden, plan for one emitter per plant, positioned 6-8 inches from the stem.
Installation Process
Step 1: Install Source Components
Connect the backflow preventer, filter, and pressure regulator to your water source in that order. Use thread tape on all connections to prevent leaks.
Step 2: Lay Main Line
Run ½-inch tubing from the water source to your growing area. Bury tubing 2-3 inches deep or secure with landscape staples if running above ground. Create gentle curves rather than sharp bends to maintain water flow.
Step 3: Install Distribution Lines
Use a hole punch tool to create openings in the main line where lateral lines will connect. Insert barbed fittings and attach ¼-inch tubing to reach individual plants or plant rows.
Step 4: Add Emitters
Punch holes in the lateral lines at each plant location and insert emitters. For tomatoes, position emitters to create a moist zone around the root area rather than saturating a single spot.
Step 5: End the Lines
Cap all tubing ends with goof plugs or end caps to maintain system pressure. Install flush valves at the system’s lowest points for maintenance.
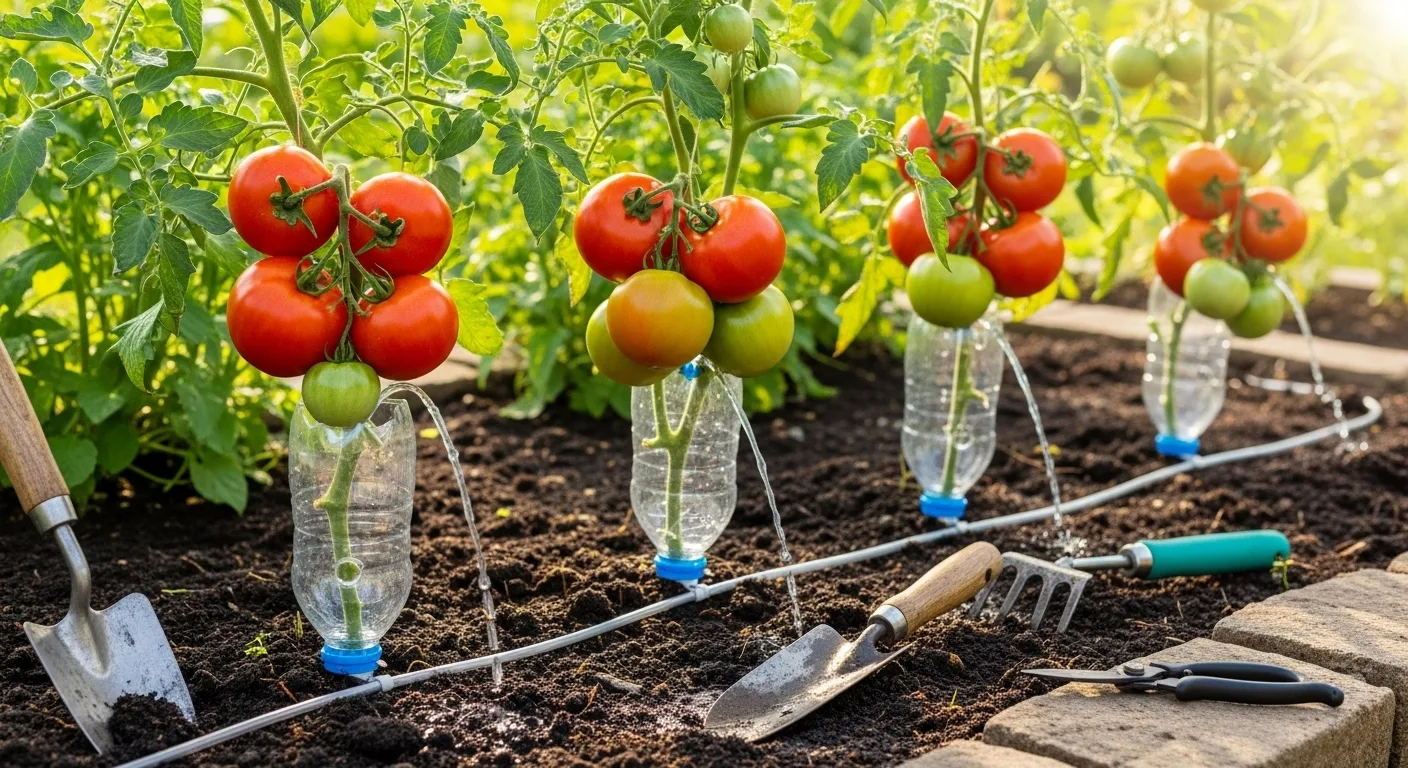
A simple homemade drip irrigation system using an upside-down plastic bottle to water plants slowly and effectively
Simple DIY Alternatives for Small Gardens
For gardeners seeking ultra-simple solutions, several low-cost alternatives can provide effective drip irrigation for small tomato plantings.
Plastic Bottle Systems
Create individual plant irrigators using 2-liter plastic bottles. Drill 3-4 small holes (1/16 inch) near the bottle cap, fill with water, and invert into the soil beside each plant. This gravity-fed system provides several days of slow water release.
Soaker Hose Method
Lay soaker hoses directly on the soil surface around tomato plants, covering with mulch to reduce evaporation. While less precise than emitter-based systems, soaker hoses offer excellent coverage for row plantings at minimal cost.
Container Drip Systems
For raised beds or container gardens, use ¼-inch tubing with inline emitters spaced according to plant requirements.
A raised garden bed with young plants illustrates a practical DIY drip irrigation system using multiple drip lines for efficient watering
This approach provides professional results with minimal investment and easy customization.
Timing and Scheduling Your System
Proper irrigation timing significantly impacts tomato yield and water efficiency. Research shows that watering every 3 days in early morning produces 15% higher yields than daily watering. Early morning irrigation (6-8 AM) allows plants to absorb water before heat stress occurs and reduces evaporation losses.
Frequency Guidelines
- Daily watering: Best for container tomatoes and newly transplanted plants
- Every 2-3 days: Ideal for established garden plants in normal weather
- Every 3 days: Optimal frequency for mature plants, providing highest yields with efficient water use
Duration Calculations
System runtime depends on emitter flow rates and desired water application. For tomatoes requiring 1 inch of water weekly, a system with 0.45 GPM per 100 feet of tubing needs approximately 5.8 hours of total weekly operation. Divide this into 2-3 sessions for optimal soil penetration.
Automation Options
Install automatic timers to maintain consistent watering schedules. Basic mechanical timers cost $25-40, while advanced WiFi-enabled controllers range from $60-150.
Automated systems prevent both under and over-watering while reducing labor requirements.
DIY drip irrigation using an inverted plastic water bottle to provide slow, consistent watering to plants
Cost Considerations and Budget Planning
DIY drip irrigation systems offer excellent value, with costs ranging from $50-500 depending on garden size and component quality.
Basic Cost Breakdown
- Small garden kit (up to 20 plants): $50-100
- Medium system (50-100 plants): $150-300
- Large installation (100+ plants): $300-500
Component Costs
Individual components allow custom system building:
- Main line tubing: $0.50-2.00 per linear foot
- Emitters: $0.50-1.50 each
- Pressure regulator: $10-30
- Timer: $25-150 depending on features
- Fittings and connectors: $20-50 per system
The investment typically pays for itself within one growing season through water savings and increased yields. Professional installation adds $150-700 in labor costs but may be worthwhile for complex systems.
Close-up of water droplets from a drip irrigation pipe near tomato plants
Maintenance and Troubleshooting
Regular maintenance ensures optimal system performance and longevity. Annual maintenance costs range from $50-100, primarily for filter cleaning and component replacement.
Routine Maintenance Tasks
- Weekly: Check for clogged emitters and system leaks
- Monthly: Clean filters and flush system lines
- Seasonally: Inspect all connections and replace worn components
- Annually: Perform complete system evaluation and upgrade worn parts
Common Issues and Solutions
Clogged emitters: Usually caused by mineral deposits or debris. Soak in vinegar solution or replace if severely blocked.
Uneven water distribution: Often indicates pressure problems. Check for kinked tubing, closed valves, or inadequate pressure regulation.
System leaks: Most commonly occur at connections. Ensure proper fitting insertion and use thread tape on threaded connections.
Winter Preparation
In freezing climates, drain all water from the system before winter to prevent freeze damage. Store removable components indoors and mark system locations for spring reinstallation.
Watering green tomato plants with a gentle flow of water to support healthy growth and hydration
Maximizing Success with Drip Irrigation
Successful drip irrigation extends beyond proper installation to include soil management and system optimization. Mulching around tomato plants reduces water evaporation by 30% while helping maintain consistent soil moisture.
Combine drip irrigation with fertigation – applying liquid fertilizer through the irrigation system – to maximize nutrient uptake efficiency. This integrated approach delivers both water and nutrients directly to root zones where plants can utilize them most effectively.
Monitor soil moisture levels regularly, especially during the first few weeks after installation.
Adjust emitter flow rates or timing based on plant response and seasonal weather changes. Well-maintained drip irrigation systems can operate efficiently for 5-10 years with minimal component replacement.
Conclusion
Drip irrigation represents the ideal watering solution for tomato plants, combining water efficiency with disease prevention and yield optimization.
With basic DIY skills and modest investment, home gardeners can install professional-quality systems that deliver consistent results season after season.
The combination of precise water delivery, reduced maintenance requirements, and improved plant health makes drip irrigation an essential tool for successful tomato cultivation.
Whether starting with simple bottle systems or installing comprehensive automated networks, drip irrigation transforms tomato growing from a daily chore into a reliable, efficient process that maximizes both plant productivity and gardener satisfaction.
